How to Use Feumr Interlocking Nails Effectively?
When it comes to bone fixation, choosing the right tools is crucial. Feumr Interlocking Nails have gained popularity for their reliability and efficiency. Surgeons appreciate their design, which ensures stability during recovery. However, effective use is paramount to achieving the best results.
Understanding how to utilize Feumr Interlocking Nails properly is essential. This involves knowing their best applications and potential complications. Many practitioners struggle with their placement and alignment, which can lead to errors. Reviewing techniques can prevent these common pitfalls.
In some cases, improper use may lead to inadequate support for the fractured bone. It's important to reflect on previous experiences and adapt methods accordingly. By mastering the use of Feumr Interlocking Nails, health professionals can significantly improve patient outcomes and enhance the healing process. Taking the time to learn and practice is worthwhile.
Understanding Feumr Interlocking Nails and Their Applications
Feumr interlocking nails are innovative tools used primarily in orthopedic surgery, particularly for long bone fractures. These nails are designed to provide stable fixation of the bones. They allow for early mobility and can significantly enhance healing. Surgeons often prefer these nails due to their ability to maintain proper alignment after a fracture.
Their application is straightforward yet requires careful consideration. The nails interlock with the bone, providing a stable structure. However, surgeons must ensure that the correct size and length are chosen for each patient. Using the wrong size can lead to complications. The insertion technique is crucial; improper placement may result in additional damage to the bone.
Despite their advantages, there are challenges. Not every fracture is suitable for this method. Sometimes, the patient's anatomy complicates the procedure. Additionally, post-operative care is essential to monitor for any signs of infection or misalignment. These factors highlight the importance of continuous learning and reflection in their usage.
How to Use Feumr Interlocking Nails Effectively?
| Application Area | Material Compatibility | Recommended Size | Usage Instructions | Advantages |
| Orthopedic Surgery | Bone | 3.5 mm - 5.0 mm | Insert nail at an angle; ensure fixation | Stability and support for fractures |
| Veterinary Applications | Animal bone | 2.5 mm - 4.0 mm | Align fracture ends; hammer gently | Quick recovery and minimal discomfort |
| Trauma Case Management | Long bones | 4.0 mm - 6.0 mm | Use guide for precise placement | Provides long-lasting internal support |
Preparing for the Procedure: Tools and Materials Needed
When preparing for the procedure using interlocking nails, the right tools and materials are crucial. Begin with a sterile surgical kit. This kit should include scalpels, forceps, and scissors. Each tool must pass checks for sterility. You also need imaging tools like X-ray equipment for accurate positioning. This can help avoid complications during the procedure.
Next, gather the interlocking nails specific to the procedure. These nails come in various sizes and shapes. It is important to select the right size based on patient anatomy. Have a set of drills ready. Ensure these are in good working condition. Test them before the procedure starts; a malfunctioning drill can create unnecessary delays. Prepare antiseptic solutions and banding materials to manage post-procedure care.
Do not overlook the importance of team communication. Ensure everyone knows their roles clearly. Dividing tasks can speed up the process. Yet, this can lead to overlapping duties if not managed well. Be open to feedback from your team. Reflect on each step as you prepare; improve where you notice gaps. Planning meticulously can greatly enhance the procedure's outcome.
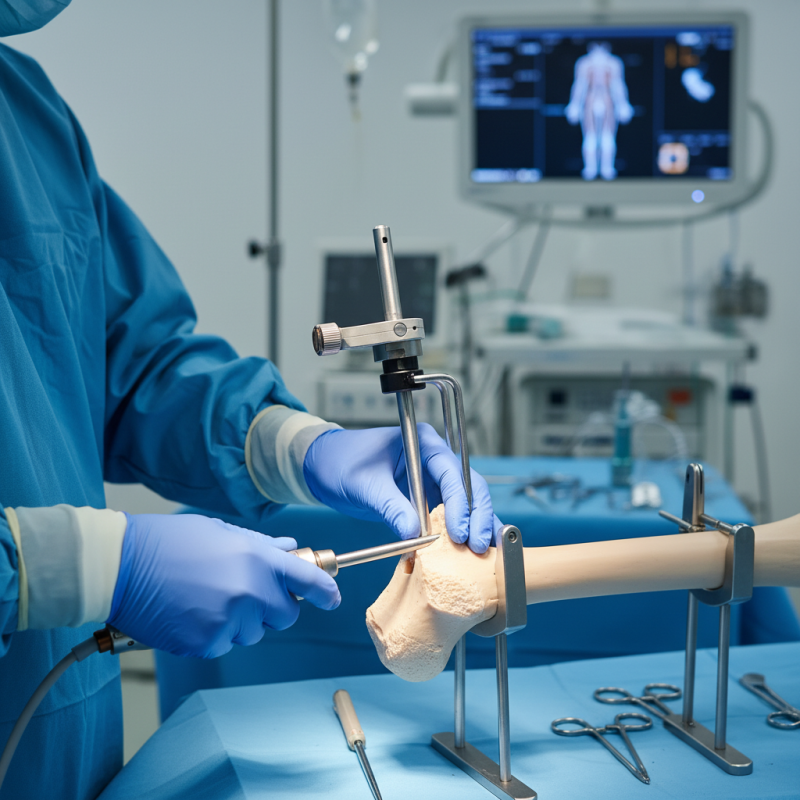
Step-by-Step Guide to Inserting Feumr Interlocking Nails
Inserting Feumr interlocking nails requires careful attention and technique. First, ensure the nail is aligned with the bone. A clear view is crucial; use proper lighting. Start by making a small pilot hole. This aids in guiding the nail smoothly into the intended location. It’s easy to misjudge the depth, so be cautious here.
Next, gently tap the nail into place. Use a mallet for controlled force. Overly aggressive strikes can damage the surrounding area. Check alignment frequently. Adjust as necessary to avoid complications later. If resistance is felt, do not force it. This could signify an issue that needs addressing.
Finally, once the nail is in position, secure it properly. Verify its stability by wiggling gently. An unstable nail could lead to further problems. Remember that precision is key. Take a moment to review your work. Learning from any missteps is crucial for success. Each insertion teaches something new, making practice important.
Post-Procedure Care and Precautions for Optimal Healing
Post-procedure care is crucial for optimal healing after using interlocking nails. The initial days post-surgery are critical. Keep the surgical area clean and dry. Use a sterile dressing to cover the incision. Change the dressing regularly, especially if it becomes wet or soiled. Monitor for any signs of infection, like increased redness or swelling. Pain management is also vital. Follow your healthcare provider’s instructions for medication. Overdoing activities in the early stages can lead to complications.
Physical therapy might be necessary depending on the procedure. Engaging with a physical therapist can help you regain strength and mobility. It’s essential to follow their advice carefully. Rushing through rehabilitation may delay your recovery. Take time to listen to your body. Rest when needed. Nutrition plays a role in recovery as well. Eating a balanced diet can support healing tissue. Remember, everyone's healing process is unique. Reflect on your healing journey and adapt as necessary.
Troubleshooting Common Issues with Feumr Interlocking Nails
When using interlocking nails, issues can arise that may affect your project. A common problem is misalignment. This often occurs during the installation phase. A report from the Journal of Orthopedic Research states that misalignment can lead to a 25% increase in failure rates. Correcting alignment requires careful adjustments and steady hands.
Tips: Use a guide to ensure the nails are straight. Consider using a jig to maintain accurate placement. This makes a significant difference in overall outcome.
Another frequent issue is inadequate support. Failing to brace the area around the nail can lead to instability. Research shows that high-stress situations can compromise the structural integrity of the installation. Ensuring ample support around the nail can alleviate such risks.
Tips: Always reinforce the tissue surrounding the implant. Consider using additional materials to support the area. The investment in support pays off in performance.